The Helmsman Animatronic

Project Overview
2017
My objective for this project was to reimagine The Helmsman scene from the Pirates of the Caribbean attraction to include additional head functions and animatronics/mechanisms, added show effects, a redecorated set, and content from the Pirates of the Caribbean movies.
I will break down The Helmsman project by the following categories to help explain how I went about tackling each challenge.
-
Animatronics/Mechanics- I incorporated a 3DOF head mechanism for The Helmsman, several jaw mechanisms for The Helmsman and talking skulls, and a four bar linkage to drive the ship wheel.
-
Props/Set Design- I built various props including a wooden ship deck, ship mast and sails, a ship wheel steering column with an attached ship wheel, a wooden treasure chest, flickering lanterns, and a whiskey barrel scene.
-
Show Effects- I added wind, water, and lightning show effects to add to the immersive experience.
-
Animation- I used Visual Show Automation (VSA) to keyframe animate all of the show effects and animatronics in sync with audio from the Pirates movies.
Animatronics/Mechanics
3DOF Head Mechanism
In my reimagined scene, I thought it would be so cool to see The HeImsman come to life and be able to move his head around. Having no prior experience with animatronic head/neck mechanisms I began looking online at different pictures and videos to understand the design principles and concepts that go into making functional animatronic characters.
In all of the animatronic head/neck mechanisms I found online, the design principle seemed to be similar across the board: the three primary functions in an animatronic head need to be head nod, head tilt, and head turn. The stacking order that made the most sense to me was starting with head turn first, and then having head nod and head tilt ride along.
I decided in order to gain the proper understanding of four bar linkages, methods of actuation, and designing mounts for actuators I needed to first practice some assembly. This way my future designs would be more informed and would have some background knowledge/experience to pull from.
I found an amazing kit at Monster Guts LLC which has been well-engineered as a 3-axis skull kit with an added jaw mechanism. I ordered this kit with the idea of taking notes and being a student of the design during assembly so as to be able to design my own mechanisms in the future.
I have a video on the right hand side showcasing the final, finished assembly as well as a CAD model I made (below) of the mechanism to gain some practice modeling parts and mating parts together in a SolidWorks assembly.
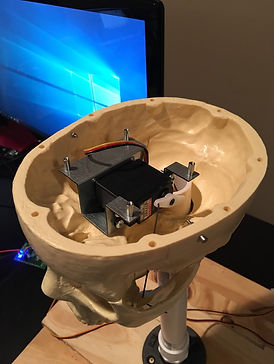
Finished head mechanism utilizing 3 HS-485HB servos for the head nod, tilt, and turn functions. The jaw servo is an HS-225BB. All head functions, with the exception of the head turn, use a four bar linkage to actuate. In each of these four bar linkages, the crank is a Hitec servo horn and the coupler is a threaded rod with two ball bearings on either end.
Helmsman head mechanism modeled in SolidWorks


Ship Wheel Four Bar Linkage
I decided to use a four bar linkage to drive the ship wheel rather than mounting a motor inside the steering column to direct drive the wheel. I wanted to gain a little hands-on experience with four bar linkages to figure out more of the principles behind functional four bar linkages and how to successfully implement them into designs. I weighed out the costs of direct driving the ship wheel and found this method to be more expensive due to the extra off-the-shelf components that were needed (bearings, shaft, motor, etc.).
One of my friends was nice enough to give me an old reindeer motor for me to use to drive the ship wheel. I figured this motor might be the most convenient for me to use since these motors come pre-programmed to rotate continuously at a relatively slower speed.
I turned to using wood and old spare parts laying around the house to optimize the four bar linkage design. The goal here was to have the ship wheel rotate through a 45° turn in a clockwise motion when starting from its neutral position. Since I had a set length I was using for the coupler (a steel bar I found laying around), I adjusted the length of the crank until I was able to achieve the desired range of motion. I did some quick linkage synthesis to determine what the crank and coupler lengths needed to be in order to achieve a 45° turn of the wheel based on where the motor was placed and the size of the wheel.
One constraint I had to take into account was to make sure the crank was not too long to where it would collide with the bottom of the ship wheel during its rotation.
In the video clip showcasing the ship wheel going through its full 45° rotation (below), I was able to figure out a way to increase the crank length while preventing it from colliding with one of the wheel's handles by adjusting the neutral/start position of the wheel.

Linkage synthesis equations for the ship wheel 45° turn
Ship wheel successfully rotating through its 45° turn
Ship wheel movement w/ 3DOF Head Mechanism
Talking Skull Jaw Mechanism
In the reimagined Helmsman scene, I wanted there to be a talking Jack Sparrow skull and a talking First Mate skull in addition to The Helmsman animatronic. This means the skulls would need to have a jaw mechanism for dialogue. To create this mechanism, I decided to mount a single servo to a bracket (off-the-shelf) which would then be mounted to a Bucky skull via bolts. I had to modify the Bucky skull itself with a Dremel to allow the bolts to properly secure the bracket to the skull. I also had to use the Dremel to make further modifications to the skull to allow it to mount to a post or rod.
The photo to the right shows the final jaw mechanism mounted into the modified Bucky skull.
The jaw mechanism works based on my crude construction of a four bar linkage. The Hitec servo horn functions as the crank, and a length of music wire functions as the coupler. Since the connection points for the four bar linkage are non-coplanar, it is important to have at least two degrees of freedom for the connections between crank to coupler and coupler to rocker. Normally, a universal joint or a ball bearing would accomplish the task. For my crude purposes, this music wire was small enough that when it was fitted into the receiving holes on the crank and on the rocker, the proper degrees of freedom were maintained. This prevented any unnecessary stresses or binding in the four bar linkage.
Jaw mechanism mounted into modified Bucky skull. Servo is a Hitec HS-425BB
Jaw mechanism in action
Props/Set Design
Wooden Treasure Chest
I figured if I was going to build a pirate scene of any sort, it would not be complete without a well done treasure chest. I decided to build a wooden treasure chest with a classic rounded top. I wanted the sides of the base to have a draft angle slightly outwards, and I wanted to make sure the top was rounded more ornately rather than just a simple curve.
In order to achieve this specific lid design, I knew I would need to cut my planks at a certain angle to allow the planks to fit together and create a curve. I did a quick calculation to figure out what angle my planks would have to be cut lengthwise to make this rounded design. The picture to the right showcases the calculation.
After building the chest, I decided to paint and decorate it. I wanted this chest to be filled with gold coins as well as some other pirate memorabilia. When all was said and done, I ended up hand gluing over one thousand gold coins down to a false bottom in addition to adding some other treasure in the chest.
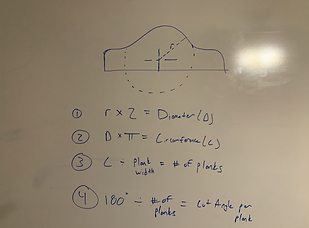
Calculation showing the cut angle for each plank in order to achieve the intended treasure chest lid design


Whiskey Barrel
Another must-have for building a pirate set is a rum barrel! My initial plan was to use some rounded wooden boards to construct a skeleton for the barrel. Then, I was going to use some flexible concrete former for planks, each tapered slightly, that would attach along the curvature of the barrel's surface.
I ended up not being able to acquire concrete former planks without having to wait weeks for a shipment. Instead, I found an old, used whiskey barrel which showed signs of significant age and use. The natural aging of this piece, I thought, would add just the right sort of character to this reimagined Helmsman scene.


Initial rum barrel skeleton build

Old, used whiskey barrel
Ship Deck Planking
I wanted my reimagined Helmsman scene to resemble a pirate ship with the Helmsman as its captain. Thus, I needed to build a faux ship deck with planks.
In order to build this ship deck, I cut up an old pallet and rebuilt it so the planks were seated flush with each other. Then, I aged the pallet by staining it with Minwax wood stain. I used Weathered Gray stain in conjunction with both Oak and Espresso stain to give the pallet an aged and salt-stained look.
This pallet also served as the base of the entire scene where the Helmsman figure was mounted, the steering column was connected, and all necessary cables were routed.

The ship deck can be seen here stained and aged to help give it the salt-stained appearance

Rebuilt pallet/ship deck (unstained)

A piece of the last plank was intentionally left out to indicate the age of The Helmsman's ship
Ship Wheel & Steering Column
I originally planned on constructing my own ship wheel using some wood and/or styrofoam. There are many online tutorials for "how to build a ship wheel" that explain each step in detail. Simply put, it can be done by routing out a piece of wood to act as the hub for the wheel spokes to house into. Then, the outside frame can be constructed and attached to the spokes with dovetail joints. The final step would be to fit some handles onto each spoke.
I ended up calculating the cost to build this ship wheel to be higher than the cost of buying a replica ship wheel. The issue for me was not having many of the power tools necessary to construct this ship wheel on my own.
In the future I would love to revisit this prop and learn more woodworking skills. My first purchase would be a router in order to route out a wooden hub for the ship wheel.
I was able to build the steering column on my own with some wood and a few off-the-shelf components. On two heftier sized boards, I traced a simple arc whose diameter was the width of the board. I used a jig saw to cut the rounded top onto each column of the steering column assembly.
Then, I used a short length of pipe to connect the two columns together. This short length of pipe also acted as the shaft for the ship wheel to rotate about. I used some rubber gaskets to slide onto the pipe to keep the ship wheel in place throughout its many rotating cycles.
If I were to have used a rubber mounted motor to direct drive the ship wheel, then the steering column would have a true shaft with bearings press fitted into each column. The ship wheel would ride on this shaft and rotate via the attached motor.
This solution was my crude work-around. The final step was to stain the steering column in the same manner as the ship deck.

My initial drawing for building the ship wheel on my own


Ship Mast & Sails
The Helmsman's pirate ship wouldn't be complete without a set of sails to go along with the rest of the ship and treasure. My inspiration for these sails came from the World of Disney store in Disney Springs. There was a prop there that had been built just prior to the release of Pirates of the Caribbean: Dead Men Tell No Tales. I loved the construction and overall daring pirate theming that had been infused into this prop. The prop was alive with pirate lore, and I wanted to try and capture that same feeling in my set of sails.
My first task was to build the main mast and the two booms that would fly the sail. I used some fence posts that I bought from Tractor Supply Company to act as the main mast and boom arms. The base for the main mast was a Christmas tree stand I bought from The Home Depot. I used some large bolts that were driven through each boom and then subsequently through the main mast to secure each boom to the mast. I covered up these bolts with some rope that I rigged around the connection points between each boom and the mast.
Looking back, I would improve upon this design by using a custom designed bracket or maybe some trusses (hidden) to support the boom and attach it to the main mast. The bolts create an issue when they are tightened because the nut ends up boring out the connection point between the boom and the mast which then loosens the connection.
Once the mast/boom assembly was finished, I moved on to creating the main sail. First, I bought some fabric and cut it into the shape of a sail. Then, I used my Silhouette printer to print out the Pirates of the Caribbean logo onto heat transfer vinyl. The final step was to then iron on the heat transfer vinyl to the fabric sail.
I rigged the main sail to the mast/boom assembly with twine rope to complete the ship's main sail and mast.


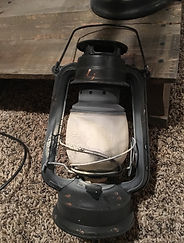
Glowing Lanterns
My main goal for building this prop was to figure out how to give the lanterns the characteristic glow of a flickering flame.
I started by going to my local hobby store and buying a few cheap lanterns that were modeled after old antiques. In addition to the lanterns, I also bought an LED flame effect bulb on Amazon to create the flickering flame illusion within each lantern. This illusion relies on an opaque glass or film, so I bought a glass frosting spray at my local craft store. I used the spray to frost the glass of the lanterns where the bulb would be housed.
In order to properly house the bulb (it needed standard bulb threads to screw into) I used a Dremel to cut out the bottom of each lantern for the standard light bulb socket to sit. Lastly, I screwed the LED flame effect bulb into this socket, placed the frosted glass covering over the bulb, and plugged in the socket to turn the lamps on.
The flickering flame effect turned out to be incredibly realistic using this method.
In the future, I would like to design some mounts for these lanterns to hang around the scene in more convenient spots than I currently have them in. This way the cables running to each light bulb socket would not distract from the scene in any way.
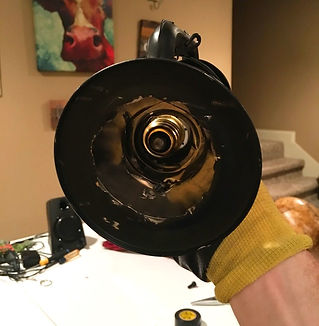
Bottom of lantern has been cut away with the Dremel, and the LED flame effect bulb can be seen

Lantern glass is not frosted here
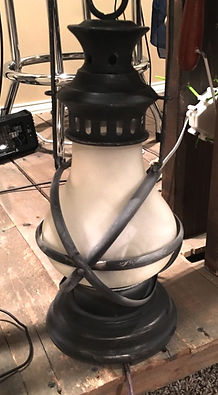
Lantern glass is frosted here
Lantern glass is frosted here
Pirate Skeleton & Skulls
I wanted the pirate skulls to take on a look of decay for this scene. Since age is important for a decaying pirate, I decided to use Minwax Gel Stain to give each skull the proper texture of decay that is worthy of an undead pirate. I applied different layers of gel stain onto the skulls to help add some depth to their seafaring history.
Next, I wanted to retrofit each skull to be able to mount to a rod or dowel for its neck. I used a Dremel to grind away an opening at the base of each skull to provide room for a neck mount as well as any head motion (in the case of The Helmsman's head). At this point, I began to plan a way to mount the skulls onto their respective neck mounts.
For The Helmsman, I purchased a cheap skeleton on Amazon and cut up the body into three main sections. The first section was comprised of the neck/head, the second section included the torso with arms, and the third section was made up of the pelvis/legs.
I fashioned a base that would sit underneath the ship deck planking and act as a mount for PVC pipe. I routed PVC pipe from the skeleton's neck, through its spine, and then out behind its lower body. The PVC terminated in the base underneath the ship deck. The base was designed to be weighted with weights in order to provide enough stability for the skeleton and any motion that would be happening in The Helmsman's arms and head.
The head's threaded rod was mounted into a wooden dowel rod which was then disguised with some plastic neck vertebrae from the skeleton's body. I used a simple wood screw to prevent the wooden dowel from shifting inside the neck vertebrae. This way The Helmsman's head could run through its motion profile on top of the PVC frame without shifting around or causing the skeleton body to topple.
My final step was to do some shopping online and at thrift stores for pirate garb. I bought a wig for Jack Sparrow complete with all of the characteristic beads and trinkets woven into his dreadlocks. The Helmsman dons a mockup of the original attire from the Pirates attraction in Disneyland.


The completed Helmsman skull rehearsing his motion profile
Jack Sparrow skull rehearsing his lines
Jack Sparrow Wall Prop
In the Disneyland Pirates attraction, the iconic Jolly Roger talking skull has been a renowned pirate character for decades. I wanted my Jack Sparrow wall prop to resemble the iconic Jolly Roger but still preserve the unique traits of Jack Sparrow, I decided I would add some plastic swords crossed underneath Jack's skull with a Jolly Roger flag as the backdrop.
In order to mount the Jack Sparrow skull, I first fastened a pipe flange mount with a female threaded insert to the wall. I then found some male threaded pipe sections at The Home Depot and screwed one into the mounted pipe flange. Next, I found a PVC elbow joint with female threads that would accept the pipe in one end and then accept a smooth connection in the other end. In the non-threaded end of the elbow joint I fitted some PVC pipe for Jack Sparrow's skull to mount to.
I made sure to spray paint this wall mount fixture black so it wouldn't distract from the show and could be well hidden in low light.

Complete Jack Sparrow prop

Initial look at the skull and crossed swords

Jack Sparrow wall mount with Jolly Roger backdrop and lantern
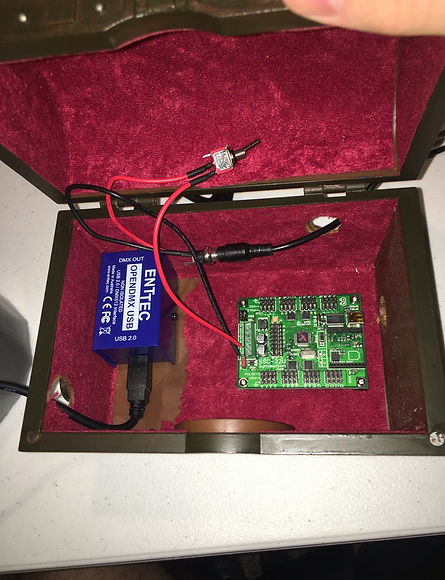
Control Box/Treasure Chest
This scene has multiple control boards it uses to interface all of the servo motors and DMX devices with my computer's animation software. I needed an enclosure to house all of these control boards cleverly such that it would fit into the scene or even enhance it. I had an old toy Davy Jones chest laying around the house that was the perfect size for housing the control boards.
I took a Dremel and a cordless drill and modified the chest to be able to mount my servo controller and DMX controller inside. The servo controller mounts inside the chest with bolts, and my DMX controller Velcro's to the bottom of the treasure chest. I placed the treasure chest into The Helmsman scene so my laptop can easily plug up without having to intrude on the scene or distract from the production.

Davy Jones treasure chest enclosure
Controller boards mounted inside the treasure chest enclosure
Show Effects
Air/Water Blaster Cannon
There are several stormy scenes throughout the course of my reimagined Helmsman scene. I wanted to find a way to incorporate more sensory effects into these scenes to create more of an immersive experience. Seeing as The Helmsman's ship would be encountering stormy seas, it made sense that waves would be crashing over the rails and onto the deck at different times.
In order to achieve this "sea spray" effect, I wanted to design some sort of air/water blaster cannon that was driven by a compressor and controlled by a solenoid. The cannon would fire with a relay or some sort of digital switch. After looking around on the internet, I found several different ways to design this blaster cannon.
1. Water can be stored in a tank and then pushed out when an electric motor drives a pump that forces the water out of the nozzle under pressure. This is similar to how a hose pipe might work. In this setup, no pressurized air is necessary.
2. Water can be stored in a tank, and air can be compressed into a separate tank. When the blaster is fired, the air and water would mix upon exiting the nozzle of the blaster.
3. Water can be stored in a tank, and air can be compressed into a separate tank (just as in the previous option). There is a chamber behind the blaster's nozzle where water can be pumped into from an external source like a bucket. Just behind the blaster's water chamber is pressurized air which is being fed to the prop via a compressor and a hose. Inside the blaster, the pressurized air and the water chamber are separated by a solenoid. When the blaster is fired, the solenoid opens and then the pressurized air pushes the water in the blaster out. This creates a wet blast of air and water. The ratio of water to air can be altered depending on how long the pump runs and moves water into the blaster's water chamber.In this setup, it is important to note that the water line needs to be primed since the water needs time to travel from its external source and to the blaster's water chamber.
Ultimately, I decided the type of "sea spray" effect I was going for would be best created with the third option for a water/air blaster cannon design. Having no prior experience with these props, I decided to order a prop and figure out how it works. I am using the water blaster cannon from Hi-Rez Studios.
It is fired with a relay that can record and then playback a stored "performance". My plan is to connect this relay with a separate microcontroller that will execute the relay playback when my animation/routine is triggered.
Air blaster/water cannon set-up and demonstration
Lightning Effect
In addition to stormy sea spray, The Helmsman's perilous journey must also be accompanied by lighting.
I decided to recreate this lightning effect with a strobe light. The animation software I used to control all my servo motors (Visual Show Automation) can also control DMX devices via a compatible DMX controller. I connected my strobe light to an Entec Open DMX controller and used VSA to fire the strobe at various frequencies and intensities.
This resulted in a very realistic lightning effect which fit the scene's perilous storms very well.
The strobe lightning effect can be seen in this clip
Animation
In order to animate my reimagined Helmsman scene, I considered two different approaches
1. I could predefine a set of joint space positions for each mechanism to travel to at certain times in the animation profile. Then, using inverse kinematics, the corresponding motor positions that are necessary to create the desired motion profile would be calculated. The motion profile would then be synced up with an audio and/or video file and played back.
2. Using a hobbyist animation software (Visual Show Automation from Brookshire Software) I could keyframe animate each function throughout the animation profile. This profile would then be synced up with an audio and/or video file and played back via my computer or onboard controller.
I decided it would be easier for me to learn VSA for my long term hobby of building animatronics in my basement. While I do have access to Simscape Multibody (MathWorks) for inverse kinematics, I do not have easy access to softwares that can translate these motor positions from Matlab into data that my servos can read. I would love to explore this option more in the future, however, as I believe it can be done.
In Visual Show Automation (VSA), each servo and DMX device was assigned a COM port. The proper baud rate was set for the COM port and the servo controller (SSC32U by Lynxmotion). I mixed and created my desired audio file using Garageband and Audacity. The audio file was exported as a .wav file and was imported into VSA. The animation events/positions were created in VSA and saved to produce the desired animation profile. This way, when the animation profile is played back, The Helmsman's movements, Jack Sparrow's dialogue, and First Mate's dialogue are all in sync with the audio file throughout the duration of the scene. The movie clip below shows how the VSA events line up with The Helmsman's routine.
Animation from The Helmsman scene
The VSA workspace is shown playing back the animation profile while The Helmsman is performing the profile in sync with the audio file
In the Future
Stay tuned...
I love trying to find new ways to take my projects and "plus" them over the years. The true fun in learning how to bring stories to life is that the experience can always be plussed somehow. That drives me to keep moving forward in order to open new doors.
In the spirit of figuring out new ways to "plus" this project, I have a few ideas of things I would like to add/change in order to bring the story to life in even more tangible ways. Stay tuned for more updates coming in the future!